Buy the right hair clippers — then actually get a clean result
Most pages about hair clippers either dump a product list or give vague “blend more” advice. This guide is built to do what a good barber does: help you choose the right setup, explain the guard system, and give you a step-by-step plan you can repeat.
- Choose faster: use the Clipper Match Tool to generate a practical spec profile (no brands, no fluff).
- Cut cleaner: guard chart + converter + buzz/fade plans so you stop guessing.
- Keep clippers sharp: maintenance routine + troubleshooting for pulling, lines, and overheating.
Want “professional hair clippers” level detail? See the advanced guide: Hairdresser Clippers Professional.

What most “hair clippers” pages get wrong
People don’t fail with clippers because they’re “bad at cutting hair.” They fail because the page they read never answers the real questions: Which tool matches my hair type? Which guard numbers produce the look I want? How do I avoid visible lines? Why do my clippers pull and overheat?
Better buying decisions
“Best hair clippers” lists are often generic. This page gives you a buying framework based on what changes the cut: torque under load, blade stability, lever control, guard fit, heat behavior, and serviceability.
Repeatable haircut plans
A clean buzz cut or fade isn’t random — it’s a sequence. You’ll get guard progressions, band sizes, and “flick-out” technique cues you can repeat without guessing.
Tools that save time
Small tools (match, convert, plan, time) turn “reading about clippers” into doing something useful — fast. No forms on this page.
On this page
- Hair clippers basics (clippers vs trimmers vs shavers)
- The buying framework (what actually matters)
- Clipper Match Tool (generate your ideal specs)
- Guard size chart + converter (numbers → mm/inches)
- How to do a clean buzz cut with clippers (step-by-step)
- Fade & taper planner (step-by-step band plan)
- Cleaning & oiling routine (stop tugging + overheating)
- Troubleshooting (pulling, patchy cuts, lines, hot blades)
- FAQs (SEO-ready)
Hair clippers basics: what to use (and what to stop confusing)
If you buy the wrong tool, even “professional” equipment won’t help. Here’s the clean breakdown in plain English. This also explains why many men end up with both clippers and trimmers — because they do different jobs.
Hair clippers
Your main tool for buzz cuts, fades, and bulk removal. Clippers are designed to run through hair efficiently and use guards for consistent length control.
Best for: “one-length” cuts, sides/back work, blending, fast maintenance between barber visits.
Trimmers / liners
Detail and finishing: edges, necklines, around ears, beard lines. If your haircut looks “almost right” but not sharp, the fix is often a trimmer finish — not another clipper pass.
Best for: crisp outline, shape-ups, beard detailing.
Electric shavers
Skin-close finish after you’ve already cut short. A shaver is not a bulk tool — it’s a finishing tool. If you want a smooth scalp or clean cheeks, a shaver can be a good final step.
Best for: close finishing, clean-up, reducing razor irritation for some men.
The buying framework: what actually changes the cut
Marketing terms are loud. Cutting performance is quiet — you feel it when the clipper hits resistance (thick hair, dense areas, awkward angles). Use this framework to choose hair clippers that match your goal, whether you want a simple buzz cut trimmer setup or barber-style fades at home.
Performance (the haircut)
- Torque under load: thick/coarse hair should not slow the clipper into tugging.
- Blade stability: stable blades blend cleaner and reduce “patchy” passes.
- Lever control: predictable taper lever positions make fades smoother and easier to fix.
- Guard fit: tight guards = consistent length; loose guards = uneven results and frustration.
- Heat behavior: cooler running feels better and helps you cut longer without discomfort.
Ownership (the long game)
- Ergonomics: balance and grip matter more than people think (especially for fades).
- Noise & vibration: less vibration means steadier work and less hand fatigue.
- Serviceability: easy blade swaps and available parts keep clippers performing for years.
- Battery reality (cordless): stable power delivery matters more than huge runtime claims.
- Cleaning workflow: if it’s annoying to clean, you won’t do it — and performance will drop.
If you want the pro-grade version of this framework (for barbers, students, and serious home cutters), use: Hairdresser Clippers Professional.
Clipper Match Tool: generate your “ideal specs” profile
No signup. No brand pushing. Answer a few quick prompts and get a spec profile you can shop with.
Your spec profile will appear here.
Tip: run this twice with different goals (for example, buzz vs fade) to see what changes.
If JavaScript is disabled, the tool won’t run — but the guide below still works.
Guard size chart (clipper numbers) + converter
Guard numbers are the language of clipper work. If you know the lengths, you stop guessing and start planning. Use the chart as your reference, then use the converter to translate between guard numbers, millimeters, and inches.
| Guard | Approx. length (mm) | Approx. length (inches) | What it’s commonly used for |
|---|---|---|---|
| #0.5 | ~1.5 mm | ~1/16″ | Very short blending, tight tapers (not skin) |
| #1 | ~3 mm | ~1/8″ | Low fades, tight sides, “short but not shaved” |
| #1.5 | ~4.5 mm | ~3/16″ | Key transition guard for fading |
| #2 | ~6 mm | ~1/4″ | Classic short sides, safe blending length |
| #3 | ~10 mm | ~3/8″ | Medium-short sides, softer contrast |
| #4 | ~13 mm | ~1/2″ | Longer sides, easy grow-out |
| #5 | ~16 mm | ~5/8″ | Longer sides; often better with comb blending |
| #6 | ~19 mm | ~3/4″ | Long sides shaping, thick hair control |
| #7 | ~22 mm | ~7/8″ | Longer guards; refine with scissors if needed |
| #8 | ~25 mm | ~1″ | Longest common guard, usually paired with scissors |
Guard Converter (instant)
Pick a guard or enter millimeters to find the closest match.
Conversion result will appear here.
Tip: if you’re planning a fade, the #1.5 guard is often the “bridge” that makes blends look smoother.
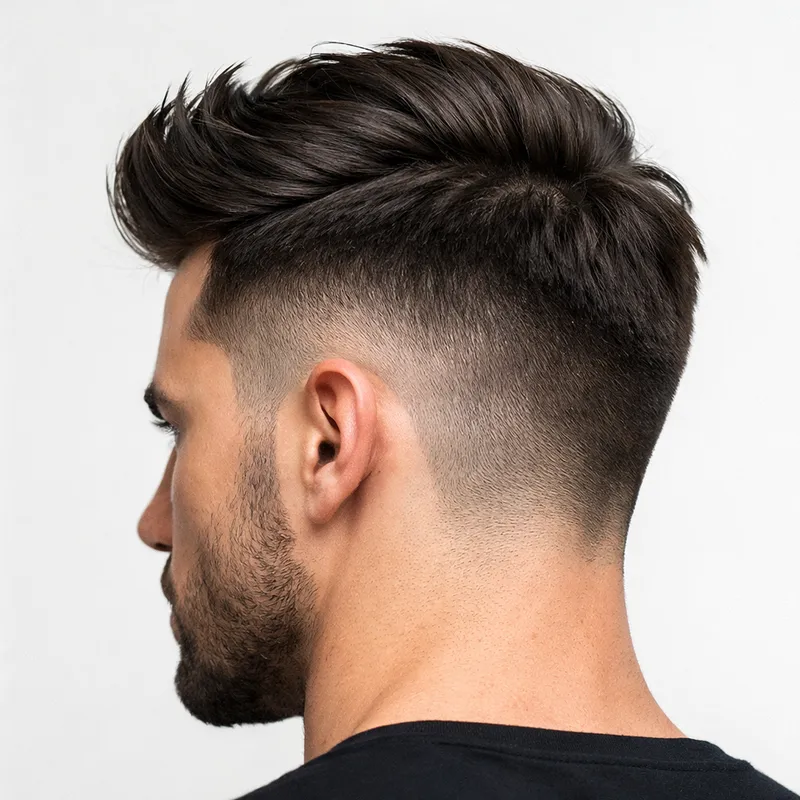
How to do a clean buzz cut with clippers (step-by-step)
A buzz cut can look sharp, rugged, or ultra-clean — but only if it’s even. The most common DIY buzz cut problem isn’t the guard number: it’s inconsistency (missed angles, uneven pressure, and ignoring growth patterns like cowlicks).
Step-by-step buzz cut workflow
- Start dry, with good lighting. Wet hair clumps and lies differently, which causes patchy results.
- Choose a longer guard than you think. Do one full pass first. You can go shorter; you can’t reverse a too-short cut.
- Cut in systematic directions: front-to-back, then side-to-side. This catches hair that lies flat in one direction.
- Use light pressure. Pressing harder increases irritation and doesn’t fix poor cutting performance.
- Slow down on swirls/cowlicks. These areas need extra passes from different angles (still with light pressure).
- Check with a mirror under strong light. The back of the head is where unevenness hides.
- Finish edges cleanly. A trimmer is ideal for the neckline and around the ears, but careful clipper work can also work.
Want the ultra-short version? Start here: Induction Cut (guard numbers, suitability & upkeep).

Fade & taper planner (tool): build a step-by-step band plan
This tool generates a simple, controlled plan so you stop “free-handing” a fade. It’s built for beginners and practical home cuts.
Your fade plan will appear here.
The #1 rule for smooth blends: keep the “bands” small and flick out at the top of each band instead of digging in.


Cleaning & oiling routine (stop tugging, overheating, and uneven cutting)
Most hair clippers don’t “randomly become bad.” They slowly lose performance because hair packs into the blade, guards collect debris, and blades run dry. The result is predictable: pulling, hot blades, and patchy cuts. Maintenance is the cheapest performance upgrade you can do.
After every cut (fast routine)
- Brush hair out of the blade teeth and guards.
- Disinfect using a hair-tool-safe disinfectant (follow the product directions).
- Oil (if required): one small drop across the blade teeth, then run clippers briefly to distribute.
- Wipe excess oil so it doesn’t attract hair and dust.
Weekly “performance reset”
- Deep clean the blade area (packed hair reduces cutting efficiency).
- Check blade alignment and screws.
- Inspect guards for cracks or looseness (loose guards = inconsistent length).

Maintenance Timer (mini tool)
Run a quick timed routine so you actually do the basics consistently.
Timer ready.
Suggested order: brush → disinfect → oil (if needed) → wipe excess → store dry.
Troubleshooting: pulling, patchy cuts, lines, hot blades
If your results look rough, don’t assume you need a new clipper immediately. Most issues are either (1) maintenance, (2) technique, or (3) a mismatch between motor torque and your hair type. Use this section to diagnose fast.
Problem: clippers pull or tug hair
- Likely causes: dull blade, dirty blade, running dry, weak torque on thick hair, too much pressure.
- Fix order: clean + oil → lighter pressure → smaller sections → consider a higher-torque clipper for thick/coarse hair.
- Pro cue: if you feel you “need to push,” something is wrong. Clippers should cut with guidance, not force.
Problem: patchy or uneven buzz cut
- Likely causes: skipping directions, inconsistent pressure, ignoring growth patterns, rushing the back of the head.
- Fix: do structured passes (front/back, side/side) and check under bright light with a mirror.
- Shortcut: slow down around swirls/cowlicks; they need multi-angle passes.
Problem: harsh lines in a fade
- Likely causes: bands too wide, not using the lever, digging in at the band edge.
- Fix: smaller bands + “flick out” + lever work between guards (the #1 ↔ #1.5 zone matters a lot).
- Beginner strategy: choose a taper or a soft fade first. Clean > extreme.
Problem: blades run hot
- Likely causes: packed hair, no oil, heavy pressure, long continuous cutting without breaks.
- Fix: clean + oil; take short breaks; avoid grinding the blade into the scalp.
- Practical upgrade: if you cut often, a backup clipper prevents rushing while the other cools.
Want the clean result without the learning curve?
If you have an event, interview, or you simply want a consistent look, the fastest move is often: get one great professional cut, then maintain it at home with light touch-ups. Your haircut looks better, grows out cleaner, and your DIY work becomes simpler.

Take this “barber clarity” script with you
Most bad haircuts happen because the request is vague. Use this short script to lock in the details:
- Sides: “Taper or low/mid/high fade?”
- Top: “Keep enough length to style / short enough to be low-maintenance.”
- Finish: “Natural neckline or sharp neckline?”
- Blend: “Soft blend or high contrast?”
If you want to build a more detailed request (fade type, top, beard), use the tools on: Barber Close to Me.
FAQs about hair clippers (SEO-ready)
Short, clear answers to the most common questions men ask when buying and using clippers.
What are the best hair clippers for a buzz cut?
For a buzz cut, prioritize consistent cutting power, a comfortable grip, and guards that lock tight. Buzz cuts expose unevenness, so guard quality matters more than people expect. Start with a longer guard, do one full pass, then step down gradually until you hit your ideal length.
Are cordless hair clippers as good as corded?
Good cordless clippers can be excellent — especially for fades and working around ears — because movement is easier without a cable. The main risk is cheap batteries or power drop under load. If you cut thick hair or cut often, choose stable torque and consider a backup option.
Why do my clippers pull/tug hair?
Tugging usually comes from a dirty or dry blade, a dull blade, or insufficient torque for your hair type. Fix order: brush out hair → disinfect → oil (if required) → use lighter pressure → cut smaller sections. If it still tugs, the blade may need replacing.
What does “zero gapped clippers” mean — and should I do it?
Zero-gapping means adjusting the blade alignment to cut closer. It can help with tight detailing, but it also reduces margin for error and can irritate skin. If you’re new, master guards + lever control first. Clean fades come more from control than from cutting ultra-close.
What are “balding clippers”?
“Balding clippers” are designed to cut very short, often closer than a standard clipper with guards. They’re useful for very tight cuts and near-bald looks, but they can increase irritation if you press hard or move too fast.
What guard number should I use for a buzz cut?
Most men start experimenting in the #2 to #4 range. #4 is safer and grows out easy; #2 is noticeably shorter. If you want ultra-short, #1 or #0.5 is aggressive and less forgiving. Start longer, then step down one guard at a time.
How do I avoid visible lines in a fade?
Keep bands small, use the lever for micro-adjustments, and “flick out” at the top of each band. Lines usually come from making the transition zone too large and digging in at the band edge. Use the planner above to generate a controlled progression.
How do I clean hair clippers properly?
Brush hair out after every cut, disinfect with a hair-tool-safe product, and oil if your blade type requires it. Clean blades cut cooler and reduce tugging. Deep clean weekly if you cut often.
Can I use hair clippers on my beard?
You can, but it’s often not ideal. Clippers are built for bulk and head hair; beards usually need tighter detail and edge control. Many men use clippers for bulk beard reduction and a trimmer for shaping and lines.
Where should I buy hair clippers?
Buy from reputable retailers with clear return policies and warranty support. Avoid suspiciously cheap listings. Comfort in-hand is personal, so having a return option is useful if the grip or weight feels wrong.
Do cheap hair clippers work?
Some can handle occasional simple buzz cuts, but cheap clippers often struggle with thick hair, run hot, pull hair, or have loose guards. If you cut often or want fades/tapers, investing in control (guard fit + lever + blade stability) is usually worth it.
How often should I replace clipper blades?
Replace when cleaning/oiling no longer restores smooth cutting, when tugging persists, or when you see uneven cutting despite correct technique. Frequency depends on how often you cut and how well you maintain the blade.
Your next step (choose one)
If you want the fastest improvement, don’t do ten things. Do one. Pick the next step that matches your intent — and you’ll get a better result with less effort.
Cut cleaner
Use guard numbers intentionally. Plan the cut. Keep bands small. Finish sharp.
Get a pro result
If you need it perfect the first time, find a specialist and bring a clear script.